| Simple guide to setting up a DVR on the LAN( Local Area Network) and WAN (Wide Area Network) Or Internet! | ||||||||||||||||||||
|
If your DVR
offers P2P or Peer to Peer type connection, this is the easiest way to
establish a quick connection to Connect the DVR to a spare socket on your router, you could even use a mains plug network adapter if it's impractical to cable. Iinstall the
app on your phone, and setup a new connection from the apps device manager
or account setup. There's often
a QR code to copy on to the phone using its camera, or you can enter
it's serial number manually. A spare LAN socket on your router, or mains plug network adaptor. (Also Wi Fi Dongles are sometimes supported)
A
std RJ45 patch lead. |
||||||||||||||||||||
|
Now we normally assign a fixed IP to the
DVR, or use it's domain name if picked up by the router and port forwarding
is supported by MAC addresses. I will use fixed IP for this demo. With the DVR plugged in and working on your network, use computer that's connected to the same network,
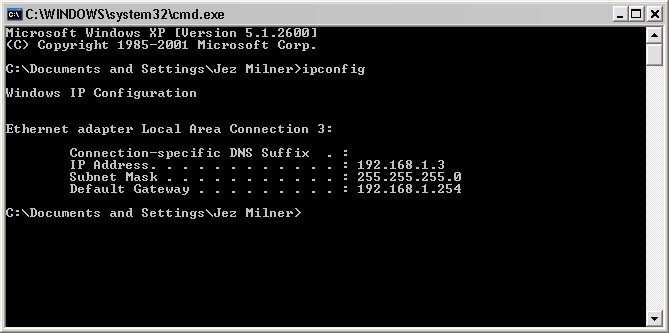
open a command prompt (Start, Run,
cmd, enter). Now type “ipconfig”
enter.
This example tells us that this particular
computer on the LAN has an IP of 192.168.1.3
This IP has either been issued by your
router or fixed by you!
The IP shown above will vary with each individual LAN setup and router.
What we’re interested in is the bottom two
the Subnet mask and
Default gateway!
Using this example, note down your own particular subnet and gateway. Note yours maybe slightly different!
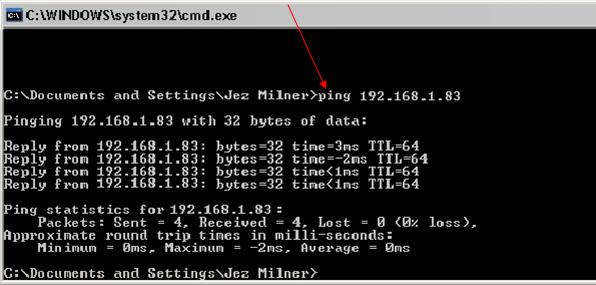
Setup your DVR's network page with a new
fixed in the same range but
not the same
as other devices on your LAN e.g. 192.168.1.83
So something similar to the above should be
entered in the DVR’s Network setup page .
Now restart the DVR and Router. If all is well the router will see that the DVR now has a fixed IP, and will reserve it always for that device! (Ideally we don't want the DVR to be issued different IP's whenever the router or DHCP table is reset.)
Now go back to your (CMD prompt) and ping
the DVR to see if it replies.
If all is well, there will be replies from
the DVR as you can see above.
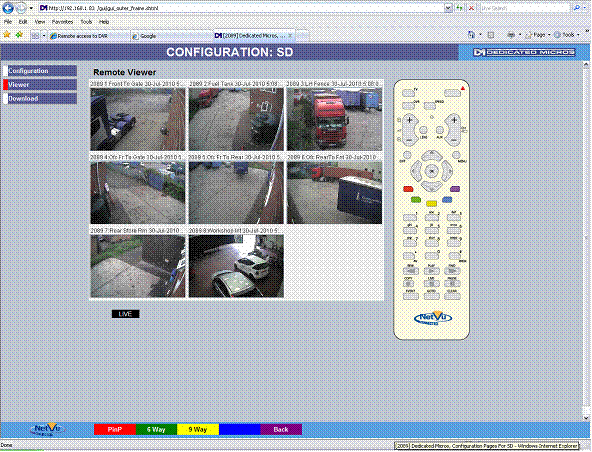
If your DVR has a web serve capability, you should be able to open your web browser and
type
the DVR’s IP into the address line,
(http://192.168.1.83) and be able to view or logon locally! You may require a port number if your DVR isn’t using port 80 (See later info) Example: (http://192.168.1.83:8080) where 8080 is the specified port number in DVR's Web
page configuration..
Now obviously the above page will vary with
different DVR’s, but you should get the idea!
Most DVR’s will also prompt you to install
"plugin" components in order
to
work correctly.
Other DVR’s may require you to load
dedicated software to view!
remote
access, as there is no additional software required! |
||||||||||||||||||||
|
OK...The DVR is now working on the LAN, now we want to view remotely via
the internet!
All routers are different and I can’t be
device specific here. But this is the general idea.
In order to be able to access the DVR remotely, you will need to setup a “Service or port forwarding Rules” in the routers configuration.
This service/rule will forward internet requests to the DVR’s fixed local IP (or Device name if DHCP is used)
The Service/Rule may be called
different names by various manufactures:
Port forwarding.
Application sharing.
Firewall rules.
Games and virtual
servers. To name but a few!
Either one will be similar in function.
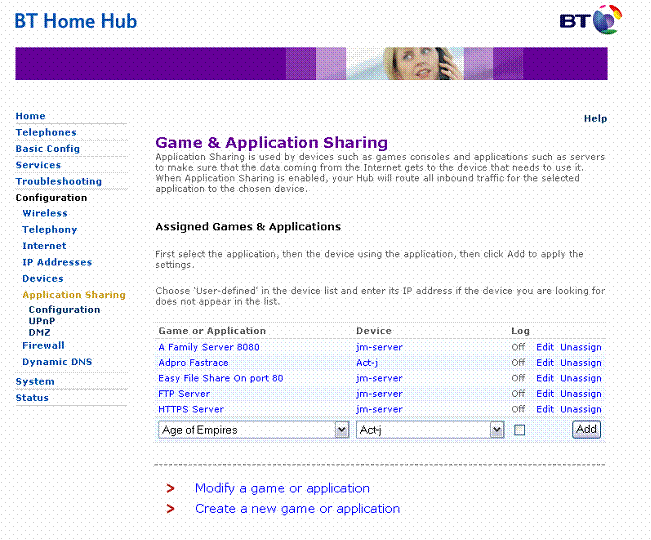
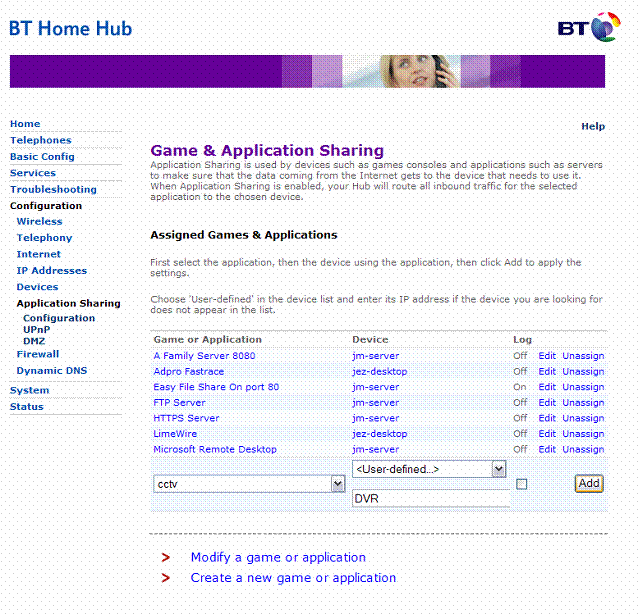
Here’s an old BT home hub, showing
some (Service’s / Rules) in operation.
Notice below, I have setup one of the
service's to forward internet queries coming in on port 80 to my file
server.
(Port 80 is the norm for Web traffic). So hopefully you are getting the idea!
In
the DVR’s network setup page you may also see something like
(PORT or NAT….This will be the route that the DVR will be sending
video or data
streams to the internet. Typical ports are 80, 8080, 7000, 5000 etc.
(You
need to be aware of the port or ports that are going to be used so see your
DVR manual).
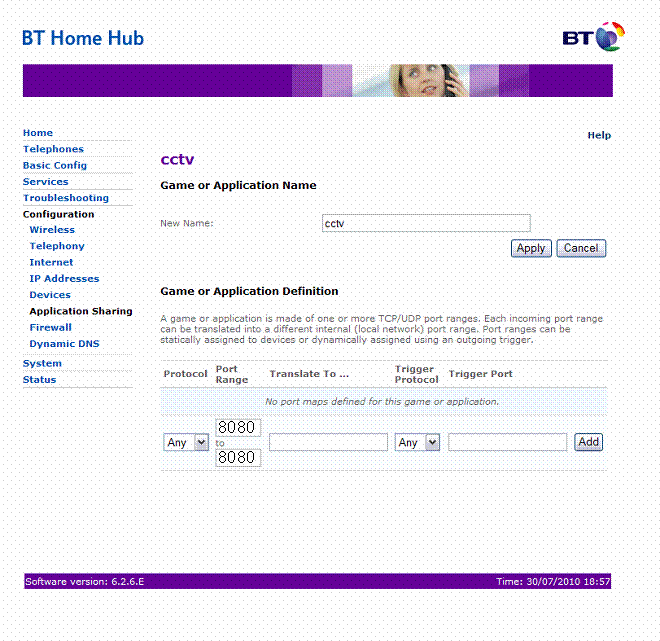
Below is a typical page where you can set a new service or rule for the DVR.
Enter a start and end port, or same if only one port is needed.
Select any/both protocol if router permits, but if
asked specifically for FTP or UDP
then select the appropriate as required
(See DVR Manual).
The
example service- rule we created above was called “cctv”
or whatever you wan to call it,
Either way apply each of the required service’s
to the DVR.
Every router is slightly different, and this is where some people give up.
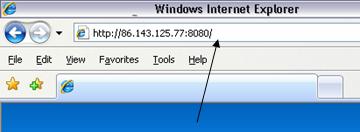
You
should now be able to access your DVR remotely.
You
type in your public ip address into your browser (and the port number If you
had to setup one).
(Note if port 80 is used in the service/rule, you need not enter the port
in the
browser
address bar. This port is always the default for web pages!
Notice
the port “8080” was used above, this is usually because you may have more
than one DVR using port 80 on your network. Simply use a colon followed by the port number for the device you want to connect to! It may be that the DVR specifies a particular port number for it's web page.
|
||||||||||||||||||||
|
|
||||||||||||||||||||
|
Dynamic IP and DDNS providers / update settings.
If
you know nothing about DDNS then don’t worry because it’s easier to set-up
than you may think!
Most domestic homes and small business are likely to have a dynamic internet IP which although cheaper than static, they may change by hour day week, and also if you loose power or reset your router. So if you want to remotely connect to your site you will need to know what public IP your site's currently on!
This is where a DDNS (Dynamic Domain
Name System) service comes in.
(No-ip or Dyn-DNS
etc amongst others) are typical providers. The cost is +/- £12 a year
which is cheap for an enhanced service and it take's only 1/2 an hour to set
up!
There are some free ones' offered by some DVR manufacturers and you may be lucky. With other free services, you may also find you need to re-register monthly to keep them live .Some even redirect via advertising before getting to your site! So it maybe better pay the small fee for an enhanced service. Either way check before buying! I use "No-IP" enhanced!
I
When your dynamic public IP changes, the DDNS provider will be able to
redirect web queries to your site's new IP because it’s been informed of
your new IP by the (Router or an updater program)!
What's an updater? (A script or program that will inform your
DDNS provider what your current public IP address is!)
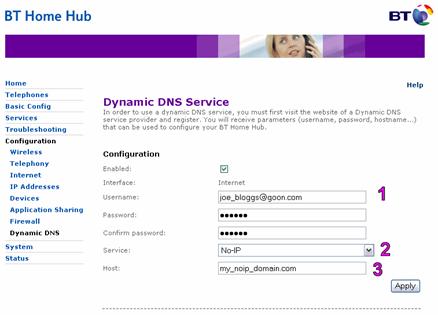
Note: A lot of routers and DVR’s these days have a built in DDNS updater service.
(See picture below). Make the router your first choice of updating, because
it’s always switched on! Also the router will be first to know if you’re IP
has changed, so it will update quicker!
If not then use the DVR as your next choice, because again; it's always
switched on! By the Router method:
1: Your logon
name
with your
DDNS Provider! Usually it's your email.
2: Service Provider: Select
from
the pull
down
menu.
3: The free
domain
name that you got when you registered
with
your
DDNS
service |
||||||||||||||||||||
|
Here’s a simple example:
When
you first setup your DDNS service, the provider will usually offer you a
free Domain name (XXX.com) or
whatever.
Ok so…today your public internet IP is
81.200.122.102 and has
(XXX.com) pointing to it by the
DDNS service provider .
The next day or so, your internet IP changes to
81.187.122.13.
The UPDATER now informs your DDNS service provider about your new IP.
Because DDNS provider is the holder of the domain name
(XXX.com) it can redirect all
internet queries from users and DNS servers around the world to your new
public IP.
(So now you can remotely access your CCTV / Computers and other devices at
your home or business using the (XXX.com)
name in your browser from anywhere in the world!
Other possibilities:
You
could also make up and register your own customised domain names like
“Freds_classic_cars.co.uk” and redirect this to
(XXX.com). Serve a web-site from your business or home computer; it opens a whole new realm of possibilities!
When
you buy domain names, they always have a redirect facility and other
advanced options, so you’re always in control!
(.co.uk’s
are about +/- £12 for 2 years, where as .com’s
are more +/- £15 per year.
Have
a look on the internet, there are plenty independent providers and also your
DDNS provider will sell
Domain names!
PROS: This method is cheaper than a static IP and more secure, as you can easily change the domain name.
(With a normal dynamic IP could save +/- £10 a month on your internet bill,
against static IP costs)!
I recommend “No-ip” as a DDNS provider, as the account setup on the internet is very simple to understand.
Also I believe “BT” are also providing a DDNS
service. But if your router or DVR has built in service, you may want to use
it in preference.
Again beware of certain free DDNS as they redirect via advertising pages and
some also need monthly renewal. Typical cost of an enhanced service that
does not require maintenance is about £12 per year.
Go
Static?
You
may consider all the above to be a bit involved, but once setup it’s very
reliable.
You
may like to take the easy option of a Static IP but you pay more!
Also
note that your current internet service may not necessarily be upgradeable!
You
may need to re-subscribe.
See if your account can be upgraded to Static IP
Other methods to obtain your site’s dynamic IP
Via stand alone updater’ programs and “IP Mailer programs”:
There are many stand alone email updaters that will post your IP changes to
your web-mail or mobile phone. Using one of these would require a computer
on site to be switched on all the time, to post the updated IP to your phone
or a web mail address.
Some of these utilities are free. Here’s one that is very good and it works as a service or in windows start-up. Link
|
||||||||||||||||||||
|
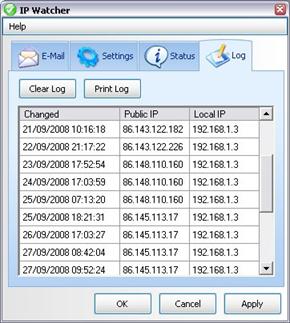
Notice here how the IP has changed 4 times in the last
6 days
|
||||||||||||||||||||
|
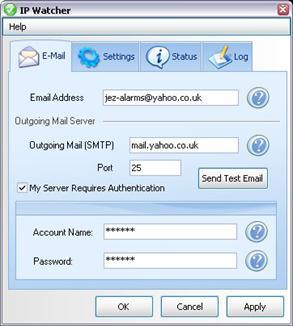
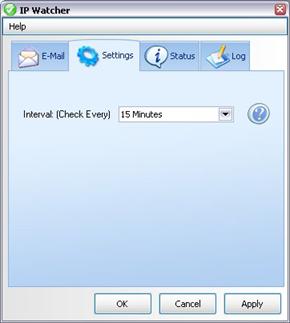
IP Mailer programs:
PROS:
It costs little or nothing to Setup and does not involve anyone else.
For added security, only you will know what your IP is today!.
CONS:
You won’t be able to serve a public web page from this setup.
(Because it’s not informing the internet of your IP changes!
)
You may have to wait for an email before you can logon to your PC or CCTV.
As such, other people you want to have access may not be able to because
they don’t share your email).
(You could consider setting up a free yahoo or hotmail account, so everyone
involved will be able to share and log on retrieve post
regarding your IP
status!)
On the whole, not as reliable. (But worth a thought!)
With this information you may feel confident enough to attempt it yourself.
It’s up to you! |
||||||||||||||||||||
|
No part of the written information above
has
been copied from any other source.
The author reserves all rights. © J milner.2011.
|
||||||||||||||||||||